| .idea | ||
| assets | ||
| src/TgBotLib | ||
| tests | ||
| .gitignore | ||
| .gitlab-ci.yml | ||
| CHANGELOG.md | ||
| LICENSE | ||
| Makefile | ||
| project.json | ||
| README.md | ||
TgBotLib
TgBotLib is a library for creating Telegram Bots in PHP, based on the Telegram Bot API.
The approach taken by this library is to be as close as possible to the Telegram Bot API, while providing a simple and easy to use interface that is easy to understand and out of your way, allowing you to use the library as a simple native around the API.
Table of contents
Versioning
The library's version is based on the version of the Telegram Bot API that it supports, for example, the version 6.5.0
of the library supports the Telegram Bot API version 6.5 and patch version reflect the current patch version of the library.
To clarify, for example 6.5.4 means the library is based on the Telegram Bot API version 6.5 and the library's patch
version is 4. Library patches are used to fix bugs or add improvements in the library, and are not related to the
Telegram Bot API version.
Installation
The library can be installed using ncc:
ncc install -p "nosial/libs.tgbot=latest@n64"
or by adding the following to your project.json file under the build.dependencies section:
{
  "name": "net.nosial.tgbotlib",
  "version": "latest",
  "source_type": "remote",
  "source": "nosial/libs.tgbot=latest@n64"
}
If you don't have the n64 source configured, you can add it by running the following command:
ncc source add --name n64 --type gitlab --host git.n64.cc
Compile from source
To compile the library from source, you need to have ncc installed, then run the following command:
ncc build
Requirements
The library requires PHP 8.0 or higher.
Usage
- Import the library using
import('net.nosial.tgbotlib'); - Create a new instance of the
TgBotLib\Botclass, passing the bot token as the first argument - Profit
require 'ncc';
import('net.nosial.tgbotlib');

$bot = new TgBotLib\Bot('<BOT TOKEN>');

/** @var \TgBotLib\Objects\Telegram\Update $update */
foreach ($bot->getUpdates() as $update)
{
    $bot->sendMessage($update->getMessage()->getChat()->getId(), 'Hello World!');
}
Each method of the TgBotLib\Bot class is named after the corresponding method of the Telegram Bot API, all methods
contains an optional $parameters argument that can be used to pass additional parameters to the API method.
But for methods that has required parameters, the library provides a more convenient way to pass them, by using
named parameters. For example, the sendMessage method requires the chat_id and text parameters, but instead
of passing them as an array, you can pass them as named parameters:
$bot->sendMessage(
    chat_id: '<CHAT ID>',
    text: 'Hello World!',
    options: [
        'parse_mode' => 'Markdown',
        'disable_web_page_preview' => true,
    ]
);
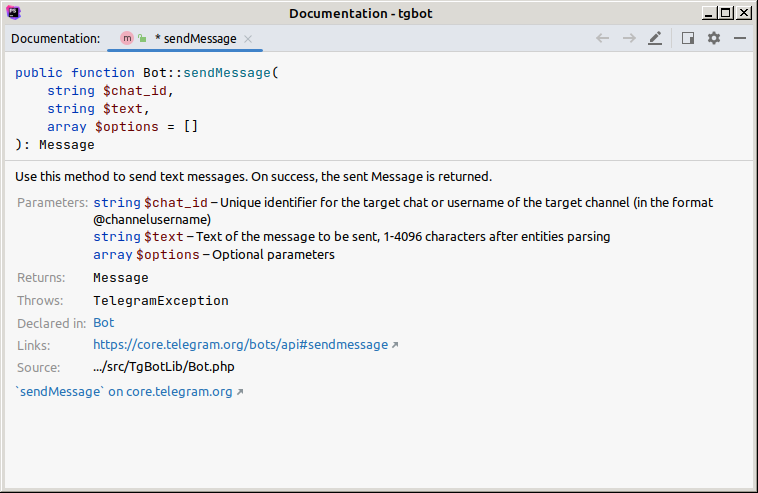
Documentation
Almost everything in the library has PhpDoc documentation, so you can use your IDE to get documentation for the
library. For example, in PhpStorm, you can press Ctrl+Q on a method to get the documentation for it:
Single-Threaded & Multi-Threaded Bots
This part will explain how to implement single-threaded and multi-threaded bots using the library. For more examples see the tests directory.
Single-Threaded Bots
To implement a single-threaded bot, it's very self-explanatory, you just need to create a new instance of the
TgBotLib\Bot class and use it to handle the updates:
<?php

    // Import ncc
    require 'ncc';

    import('net.nosial.tgbotlib');

    // Require commands & event handlers
    require 'commands' . DIRECTORY_SEPARATOR . 'StartCommand.php';
    require 'commands' . DIRECTORY_SEPARATOR . 'HashCommand.php';

    // Create a new instance of the bot
    $bot = new TgBotLib\Bot(getenv('BOT_TOKEN'));

    // Loop forever
    while(true)
    {
        /** @var \TgBotLib\Objects\Telegram\Update $update */
        foreach ($bot->getUpdates() as $update)
        {
            $bot->sendMessage($update->getMessage()->getChat()->getId(), 'Hello World!');
        }
    }
This approach is very simple and allows for easier debugging, but it's not recommended for production use, because it will block the script until the updates are handled, and if the bot receives a lot of updates, it will take a long time to handle them. So it's recommended to use a multithreaded approach for production bots.
Multi-Threaded Bots
To implement a multi-threaded bot, you need to install TamerLib which will allow you to run parallel operations using a Message Server
First create a worker process that will handle the updates:
<?php

    // Import ncc
    require 'ncc';

    // Import packages
    import('net.nosial.tgbotlib');
    import('net.nosial.tamerlib');

    // Require commands
    require 'commands' . DIRECTORY_SEPARATOR . 'StartCommand.php';
    require 'commands' . DIRECTORY_SEPARATOR . 'HashCommand.php';

    // Initialize the bot
    $bot = new TgBotLib\Bot('bot_token');

    // Set the command handlers
    $bot->setCommandHandler('start', new \commands\StartCommand());
    $bot->setCommandHandler('hash', new \commands\HashCommand());

    // Initialize the worker & register the handle_update function
    TamerLib\Tamer::initWorker();
    TamerLib\Tamer::addFunction('handle_update', function (\TamerLib\Objects\Job $job) use ($bot)
    {
        $bot->handleUpdate(\TgBotLib\Objects\Telegram\Update::fromArray(json_decode($job->getData(), true)));
    });

    // Work forever
    TamerLib\Tamer::work();
Then create a master process that will send the updates to the worker:
<?php

    // Import ncc
    require 'ncc';

    // Import packages
    import('net.nosial.tgbotlib');
    import('net.nosial.tamerlib');

    // Require commands
    require 'commands' . DIRECTORY_SEPARATOR . 'StartCommand.php';
    require 'commands' . DIRECTORY_SEPARATOR . 'HashCommand.php';

    // Initialize the bot
    $bot = new TgBotLib\Bot('bot_token');

    // Initialize the master & add the worker
    TamerLib\Tamer::init(\TamerLib\Abstracts\ProtocolType::Gearman, [
        '127.0.0.1:4730'
    ]);
    TamerLib\Tamer::addWorker('handle_update', 4);

    // Start the workers
    TamerLib\Tamer::startWorkers();

    // Handle updates forever
    while(true)
    {
        /** @var \TgBotLib\Objects\Telegram\Update $update */
        foreach ($bot->getUpdates() as $update)
        {
            TamerLib\Tamer::do('handle_update', json_encode($update->toArray()));
        }
    }
Commands & Event Handlers
Commands and event handlers are a way to handle commands and events sent by the user, for example, when the user
sends the /start command, you can send a welcome message to the user.
Commands
The library provides a way to handle commands and events using the TgBotLib\Bot class, for example, to handle
the /start command, you can use the setCommandHandler method:
<?php
    require 'ncc';
    import('net.nosial.tgbotlib');

    $bot = new TgBotLib\Bot(getenv('BOT_TOKEN'));
    $bot->setCommandHandler('start', new \commands\StartCommand());
The setCommandHandler method takes two arguments, the first being the command name (without the / prefix), and
the second being a class that implements the TgBotLib\Interfaces\CommandInterface interface.
The interface has only one method, handle, which takes two arguments, the first being an instance of the
TgBotLib\Bot class which is used to invoke the API without having to recreate the instance, and the second being
the update object. The update object is an instance of the TgBotLib\Objects\Telegram\Update class, which contains
all the information about the update.
<?php

    namespace commands;

    use TgBotLib\Bot;
    use TgBotLib\Interfaces\CommandInterface;
    use TgBotLib\Objects\Telegram\Update;

    class StartCommand extends CommandInterface
    {
        public function handle(Bot $bot, Update $update): void
        {
            $bot->sendMessage($update->getMessage()->getChat()->getId(), 'Hello World!');
        }
    }
Event Handlers
Event handles are similarly implemented, but instead of using the setCommandHandler method, you use the
setEventHandler method:
<?php

    require __DIR__ . DIRECTORY_SEPARATOR . 'autoload.php';

    $bot = new TgBotLib\Bot(getenv('BOT_TOKEN'));

    $bot->setEventHandler('message', new \events\MessageEvent());
And the interface EventInterface is used instead of CommandInterface:
<?php

    namespace events;

    use TgBotLib\Bot;
    use TgBotLib\Interfaces\EventInterface;
    use TgBotLib\Objects\Telegram\Update;

    class MessageEvent implements EventInterface
    {
        public function handle(Bot $bot, Update $update): void
        {
            $bot->sendMessage($update->getMessage()->getChat()->getId(), 'Hello World!');
        }
    }
License
This project is licensed under the MIT License - see the LICENSE file for details